Battery switch on travel trailer function is crucial for managing your RV’s power. Understanding how these switches work – whether single, dual, or rotary – is key to safe and efficient power distribution. This guide breaks down the different types, operation procedures, troubleshooting tips, and safety precautions, ensuring you’re confident in managing your travel trailer’s electrical system. We’ll cover everything from basic operation to upgrading your switch, making sure you’re prepared for any situation on the road.
From understanding the nuances of various switch types and their power management capabilities to mastering safe operation procedures and effective troubleshooting techniques, this guide equips you with the knowledge to confidently navigate the complexities of your travel trailer’s electrical system. We’ll explore how the battery switch interacts with other components like your converter, inverter, and solar panels, creating a clear picture of the entire power flow.
Finally, we’ll address safety concerns and guide you through upgrading or replacing your battery switch, ensuring smooth sailing on your next adventure.
Battery Switch Types in Travel Trailers: Battery Switch On Travel Trailer Function
Choosing the right battery switch for your travel trailer is crucial for managing power effectively and preventing electrical issues. Different switches offer varying levels of control and complexity, each with its own set of advantages and disadvantages. Understanding these differences will help you select the best option for your needs.
Single Battery Switch Operation
A single battery switch is the simplest type, typically a simple on/off switch. It controls the power flow from a single battery to the trailer’s 12-volt system. This is suitable for trailers with only one battery and basic power requirements. The power flows directly from the battery to the trailer’s electrical system when the switch is on.
When off, it completely disconnects the battery from the trailer’s electrical system, preventing parasitic drain.
Dual Battery Switch Operation
Dual battery switches manage power from two batteries. These switches often allow for isolating each battery, combining them for increased power, or using one for house loads and the other for starting the vehicle’s engine. This provides more flexibility and extends battery life. Common configurations include those that allow selecting either battery individually, combining both, or completely disconnecting both from the trailer’s electrical system.
Rotary Battery Switch Operation
Rotary switches provide multiple positions, allowing for more control over power distribution. These switches usually offer several positions, such as “off,” “battery 1,” “battery 2,” and “both batteries.” Some advanced rotary switches even incorporate features like an “auxiliary” position for connecting to a generator or shore power. This added level of control is especially beneficial for larger trailers with significant power demands.
Comparison of Battery Switch Types
| Feature | Single Switch | Dual Switch | Rotary Switch |
|---|---|---|---|
| Cost | Low | Medium | High |
| Complexity | Low | Medium | High |
| Number of Batteries Controlled | One | Two | Two or more (depending on the model) |
| Functionality | On/Off | Individual battery selection, combined use, or off | Multiple positions for various combinations and auxiliary connections |
Battery Switch Operation and Procedures

Operating your travel trailer’s battery switch correctly is crucial for maintaining your batteries and preventing electrical issues. Understanding the type of switch you have and following the proper procedures will ensure safe and reliable power for your RV. Always consult your RV’s owner’s manual for specific instructions related to your model.Proper battery switch operation prevents accidental drain, protects sensitive electronics, and extends battery lifespan.
Incorrect operation can lead to battery damage, electrical fires, or even injury. Therefore, understanding and following these procedures is paramount.
Battery Switch Operation: General Procedures
Before working with any electrical components, always disconnect the negative terminal of your vehicle’s battery. This is a critical safety precaution to prevent accidental shocks or short circuits. Once you’ve completed any work, reconnect the negative terminal last.
- Locate the Battery Switch: Your battery switch is usually located near your batteries, often in a compartment under the trailer. It may be clearly labeled or integrated into a larger electrical panel.
- Identify Switch Positions: Most switches have three positions: “Off,” “Batteries Only,” and “Batteries and Charger/Shore Power.” Some may have only “On” and “Off,” connecting directly to the batteries.
- Turn the Switch “Off”: Before performing any maintenance or connecting/disconnecting batteries, always start with the switch in the “Off” position. This completely isolates the batteries from the trailer’s electrical system.
- Connect/Disconnect Batteries (as needed): Follow the specific instructions below for your battery switch type.
- Turn the Switch “On”: Once you’ve completed your connections, carefully turn the switch to the desired position (“Batteries Only” for using only the house batteries or “Batteries and Charger/Shore Power” to use both batteries and shore power).
Battery Switch Operation: Rotary Switch Procedures
Rotary switches are common in travel trailers. They usually have multiple positions allowing for various combinations of battery and power source usage.
- Off Position: Completely disconnects the batteries from the trailer’s electrical system. This is the first step before any maintenance or battery work.
- Batteries Only Position: Connects only the house batteries to the trailer’s electrical system. This is useful when dry camping or when you want to use only battery power.
- Batteries and Charger/Shore Power Position: Connects both the house batteries and the shore power (or generator) to the trailer’s electrical system. This is the standard position for use at campsites with hookups.
Battery Switch Operation: Toggle Switch Procedures
Toggle switches often operate with a simple “On” and “Off” configuration. They may only control the entire battery bank’s connection to the system.
- Off Position: Disconnects the batteries from the trailer’s electrical system.
- On Position: Connects the batteries to the trailer’s electrical system. There is no selection for charger/shore power integration; the batteries power everything when “On”.
Battery Switch Maintenance
Regular maintenance ensures the safe and reliable operation of your battery switch.
- Visual Inspection: Regularly inspect the switch for any signs of corrosion, loose connections, or damage. Clean any corrosion with a wire brush and baking soda solution.
- Tighten Connections: Periodically check and tighten all terminal connections to prevent loose connections and potential arcing.
- Lubrication: For rotary switches, apply a small amount of dielectric grease to the switch mechanism to ensure smooth operation and prevent corrosion.
- Professional Service: If you notice any problems with your battery switch, such as difficulty switching positions or unusual noises, consult a qualified RV technician for professional service.
Troubleshooting Common Battery Switch Issues
Your travel trailer’s battery switch is a critical component, ensuring you can easily manage power to your appliances and systems. Problems with this switch can leave you stranded without power, so understanding how to troubleshoot common issues is essential for a smooth camping experience. This section will guide you through identifying, diagnosing, and resolving some of the most frequent problems.
Corrosion on Battery Switch Connections
Corrosion is a common culprit behind battery switch malfunctions. Moisture, salt air, and general exposure to the elements can cause a buildup of corrosive material on the terminals and connections, hindering the flow of electricity. This can manifest as dim lights, slow charging, or complete power failure. To diagnose corrosion, carefully inspect the terminals and connections of your battery switch.
Look for green or white powdery deposits, discoloration, or signs of pitting. A visual inspection is often enough to identify this issue. Resolution involves cleaning the connections. First, disconnect the battery cables from the switch. Then, use a wire brush or sandpaper to carefully clean the terminals and connections, removing all traces of corrosion.
Apply a corrosion inhibitor or dielectric grease to the cleaned surfaces to prevent future corrosion before reconnecting the cables. Ensure tight connections.
Loose Connections at the Battery Switch
Loose connections, even without visible corrosion, can interrupt the electrical circuit. Vibration from travel can loosen connections over time, leading to intermittent power or complete power loss. Diagnosing loose connections requires a visual inspection. Check all the connections at the battery switch, including the battery cables, the switch itself, and any wiring connected to it. Gently wiggle each connection; if there’s movement, it’s loose.
To resolve this, tighten the connections using the appropriate wrench or screwdriver. If the connection is severely loose or damaged, replacement of the terminal or wire may be necessary.
So, you’re an audiophile who travels? Awesome! Check out this guide on creating the perfect audiophile travel setup for pristine sound on the go. It’s crucial to protect your gear, and that includes having the right insurance. Before you jet off, make sure you’ve sorted out your travel insurance; Aon travel insurance is a popular choice, offering various coverage options to keep your mind at ease while you’re exploring new soundscapes.
Remember to pack smart and enjoy the journey!
Faulty Battery Switch
A faulty battery switch itself can cause a variety of problems. This might be due to internal wear and tear, damage from exposure to the elements, or simply a manufacturing defect. Symptoms of a faulty switch can range from intermittent power issues to a complete inability to switch power on or off. Diagnosing a faulty switch can be trickier.
A visual inspection might reveal obvious damage, such as cracks or burns. A simple test involves checking the voltage at the battery and at the output of the switch using a multimeter. If there’s a significant voltage drop across the switch when it should be “on,” the switch is likely faulty. Resolution involves replacing the faulty switch.
This often requires disconnecting the battery cables and following the manufacturer’s instructions for installation of a new switch. Ensure you correctly match the amperage rating of the new switch to your system’s needs.
Blown Fuse in the Battery Switch Circuit
Many battery switches incorporate a fuse as an additional safety measure. A blown fuse will interrupt the circuit, preventing power from reaching the appliances. A blown fuse is usually easily identifiable; the fuse will appear broken or visibly burnt. To diagnose a blown fuse, inspect the fuse within the switch housing. If it’s blown, replace it with a fuse of the same amperage rating.
Be sure to turn off the battery switch before checking the fuse. If the fuse blows repeatedly after replacement, there may be a short circuit in the system that needs to be addressed before replacing the fuse again.
Battery Switch and Electrical System Integration
Your travel trailer’s battery switch is the central control point for your DC power system, but it doesn’t operate in isolation. Understanding its interaction with other electrical components is crucial for safe and reliable operation. This section will detail how the battery switch works in conjunction with your converter, inverter, and solar panels.The battery switch acts as a gatekeeper, selectively connecting or disconnecting your house batteries from the rest of the electrical system.
This allows you to control power flow, protecting your batteries and preventing accidental discharges. It also plays a critical role in preventing backfeeding, which could damage sensitive electronics.
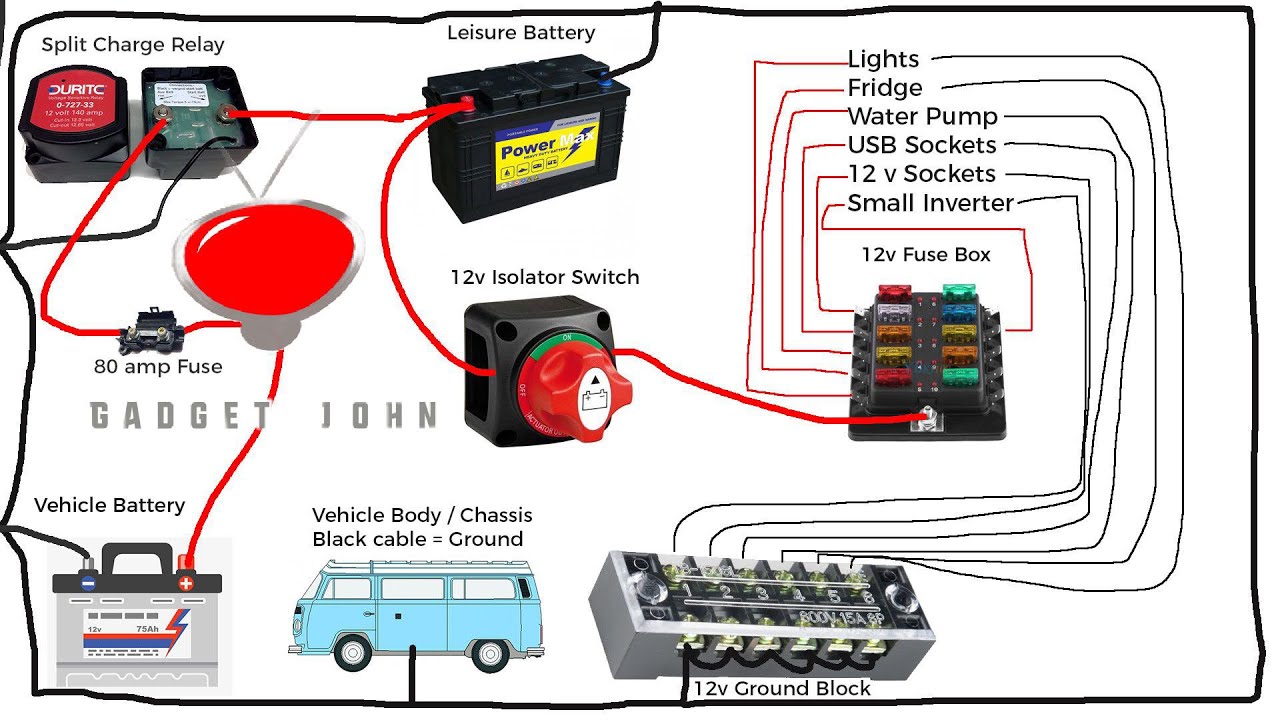
Power Flow Diagram
The following diagram simplifies the power flow in a typical travel trailer electrical system. Note that specific configurations may vary.
| Component | Description | Connection to Battery Switch |
|---|---|---|
| House Batteries | 12V DC power source for the trailer. | Directly connected; switch controls connection to the rest of the system. |
| Battery Switch | Controls the connection between the house batteries and the rest of the system. Usually has multiple positions (e.g., OFF, Battery, Battery & Shore). | Connects to house batteries and the main distribution panel. |
| Converter | Transforms 12V DC from the batteries to 120V AC for appliances. | Connected to the main distribution panel (after the battery switch). |
| Inverter | Transforms 12V DC from the batteries to 120V AC, typically for higher-power devices. | Connected to the main distribution panel (after the battery switch). |
| Solar Panels | Generate 12V DC power from sunlight. | Usually connected to a charge controller, which then connects to the batteries (either directly or via a secondary switch). |
| Main Distribution Panel | Distributes 12V DC and 120V AC power throughout the trailer. | Receives power from the battery switch and the converter. |
Proper Wiring and Connections
Safe and efficient operation hinges on correct wiring and secure connections. Loose connections can lead to overheating, sparking, and even fire. All wiring should be appropriately sized for the current it carries, using marine-grade wire for durability and resistance to corrosion. Properly sized fuses and circuit breakers are essential for overload protection. Always consult your trailer’s wiring diagram and follow manufacturer recommendations for connections.
Use crimp connectors and heat shrink tubing for durable, waterproof connections. Regularly inspect connections for corrosion or looseness. If you are not comfortable working with electrical systems, consult a qualified RV technician.
Safety Considerations When Using a Battery Switch
Working with batteries and electrical systems in your travel trailer requires caution. Improper handling can lead to serious consequences, including injury or damage to your RV. Understanding the potential hazards and following safe practices is crucial for a safe and enjoyable RV experience.
Battery switches, while convenient, present specific risks if not used correctly. The high voltage and amperage involved can cause severe electrical shocks, short circuits leading to fires, and even explosions from damaged batteries. Taking appropriate safety measures is paramount to mitigating these dangers.
So, you’re an audiophile who travels? Awesome! Check out this guide on creating the perfect audiophile travel setup for pristine sound on the go. It’s crucial to protect your gear, and while you’re planning that, don’t forget travel insurance! Getting Aon travel insurance gives you peace of mind knowing your investments are covered should anything happen during your adventures.
Happy listening and safe travels!
Potential Hazards of Improper Battery Switch Operation
Improper operation of a battery switch can result in several dangerous situations. A short circuit, for instance, occurs when the positive and negative terminals of a battery are directly connected, creating a massive surge of current. This can generate intense heat, potentially melting wires, igniting nearby flammable materials, and causing a fire. Similarly, touching exposed wires or terminals while the switch is engaged can result in a severe electrical shock, potentially fatal.
Furthermore, damaged batteries can release flammable gases, increasing the risk of explosion if a spark is present.
Safety Precautions When Working with Battery Switches, Battery switch on travel trailer function
Before working on any electrical components in your travel trailer, including the battery switch, it’s vital to take several safety precautions. These steps minimize the risks associated with high voltage and potential hazards.
The following safety precautions should be observed at all times:
- Always disconnect the negative (-) battery terminal first before working on any electrical components. This prevents accidental short circuits and protects you from electrical shocks.
- Wear appropriate personal protective equipment (PPE), including safety glasses to protect your eyes from sparks or battery acid splashes, and insulated gloves to prevent electrical shocks. Rubber-soled shoes also offer additional protection.
- Ensure adequate ventilation when working near batteries, as they release flammable gases during operation and charging. Work in a well-ventilated area or use a battery vent to disperse these gases.
- Use insulated tools when working with electrical components. Avoid using metal tools that could conduct electricity.
- Never work on electrical systems if you are wet or in damp conditions. Water is a conductor of electricity, significantly increasing the risk of electric shock.
- If you are unsure about any aspect of the procedure, consult a qualified RV technician. Improper handling can lead to serious consequences.
Correct Procedures for Handling Batteries and Electrical Components
When handling batteries, always use caution. Avoid touching the terminals directly and never short circuit the terminals. If battery acid spills, neutralize it immediately with baking soda and water, then carefully clean the area. When working with electrical components, always ensure the power is off before making any connections or adjustments. Use a multimeter to verify that the power is indeed off before proceeding.
Always double-check your connections to ensure they are secure and correctly wired to prevent short circuits. After completing your work, reconnect the battery terminals, connecting the positive (+) terminal last.
Upgrading or Replacing a Battery Switch
Upgrading your travel trailer’s battery switch can improve its functionality, reliability, and safety. This might be necessary if your current switch is failing, you need more features (like a dedicated start battery switch), or you’re simply looking to enhance your electrical system. Choosing the right replacement and installing it correctly are key to a successful upgrade.
Battery Switch Brands and Models
Several reputable brands offer battery switches suitable for travel trailers. The best choice depends on your specific needs and budget. Consider factors like the number of batteries you have, the amperage rating, and desired features (such as illuminated switches or disconnect capabilities).
| Brand | Model (Example) | Features | Price Range (USD) |
|---|---|---|---|
| Blue Sea Systems | 7611 (example) | High amperage capacity, durable construction, clear labeling | $50 – $150 |
| Perko | 0544DP12 (example) | Waterproof, robust design, often used in marine applications | $40 – $100 |
| Xantrex | (various models available) | Often integrated with other electrical components, advanced features | $100 – $300+ |
| AGS | (various models available) | Automatic charging and switching capabilities | $150 – $400+ |
Note
Prices are estimates and can vary based on retailer and specific model.*
Safe Removal and Replacement of a Battery Switch
Replacing your battery switch requires careful attention to safety. Disconnecting the battery is crucial to prevent accidental shocks or short circuits.
- Disconnect the Battery: Always disconnect the negative (-) battery terminal first. This prevents accidental shorts.
- Remove the Old Switch: Carefully remove the wires connected to the old battery switch. Take photos or make a detailed diagram to remember the wiring configuration. Note the wire gauge and color-coding.
- Install the New Switch: Mount the new switch securely in the same location as the old switch. Ensure that it’s properly grounded.
- Reconnect the Wires: Connect the wires to the new switch according to your diagram or photos. Double-check all connections for tightness and correct polarity.
- Reconnect the Battery: Connect the positive (+) terminal first, then the negative (-) terminal.
- Test the Switch: Thoroughly test the new switch to ensure it’s functioning correctly. Check all battery banks and circuits to confirm proper operation.
Tools and Materials Needed
Having the right tools and materials on hand will make the replacement process smoother and safer.
- Wire strippers/cutters
- Screwdrivers (Phillips and flathead)
- Wrench (size appropriate for battery terminals)
- Multimeter (to test voltage and continuity)
- New battery switch
- Appropriate gauge wiring (if needed)
- Electrical tape
- Safety glasses
- Work gloves
Mastering your travel trailer’s battery switch is essential for safe and reliable power. By understanding the different switch types, their operation, and potential problems, you can confidently manage your RV’s electrical system. Remember to prioritize safety and always follow the correct procedures. With this knowledge, you’ll be well-equipped to handle any situation and enjoy worry-free travels. So, get out there and explore!
Key Questions Answered
What happens if I leave my battery switch in the “off” position?
Leaving the switch off completely disconnects your house batteries from the trailer’s electrical system. This prevents any drain on the batteries, but also means you won’t have power to appliances or lights.
Can I use a battery switch with a solar panel system?
Yes, but the wiring needs to be correctly configured to ensure the solar panel charges the batteries even when the switch is off. Consult a professional if you’re unsure.
How often should I inspect my battery switch for corrosion?
Ideally, inspect your battery switch at least once a year, or more frequently if you use your trailer in harsh conditions. Look for corrosion, loose connections, or any signs of damage.
What size battery switch do I need for my travel trailer?
The appropriate size depends on the amperage of your batteries and electrical system. Check your trailer’s documentation or consult an electrician for the correct size.
